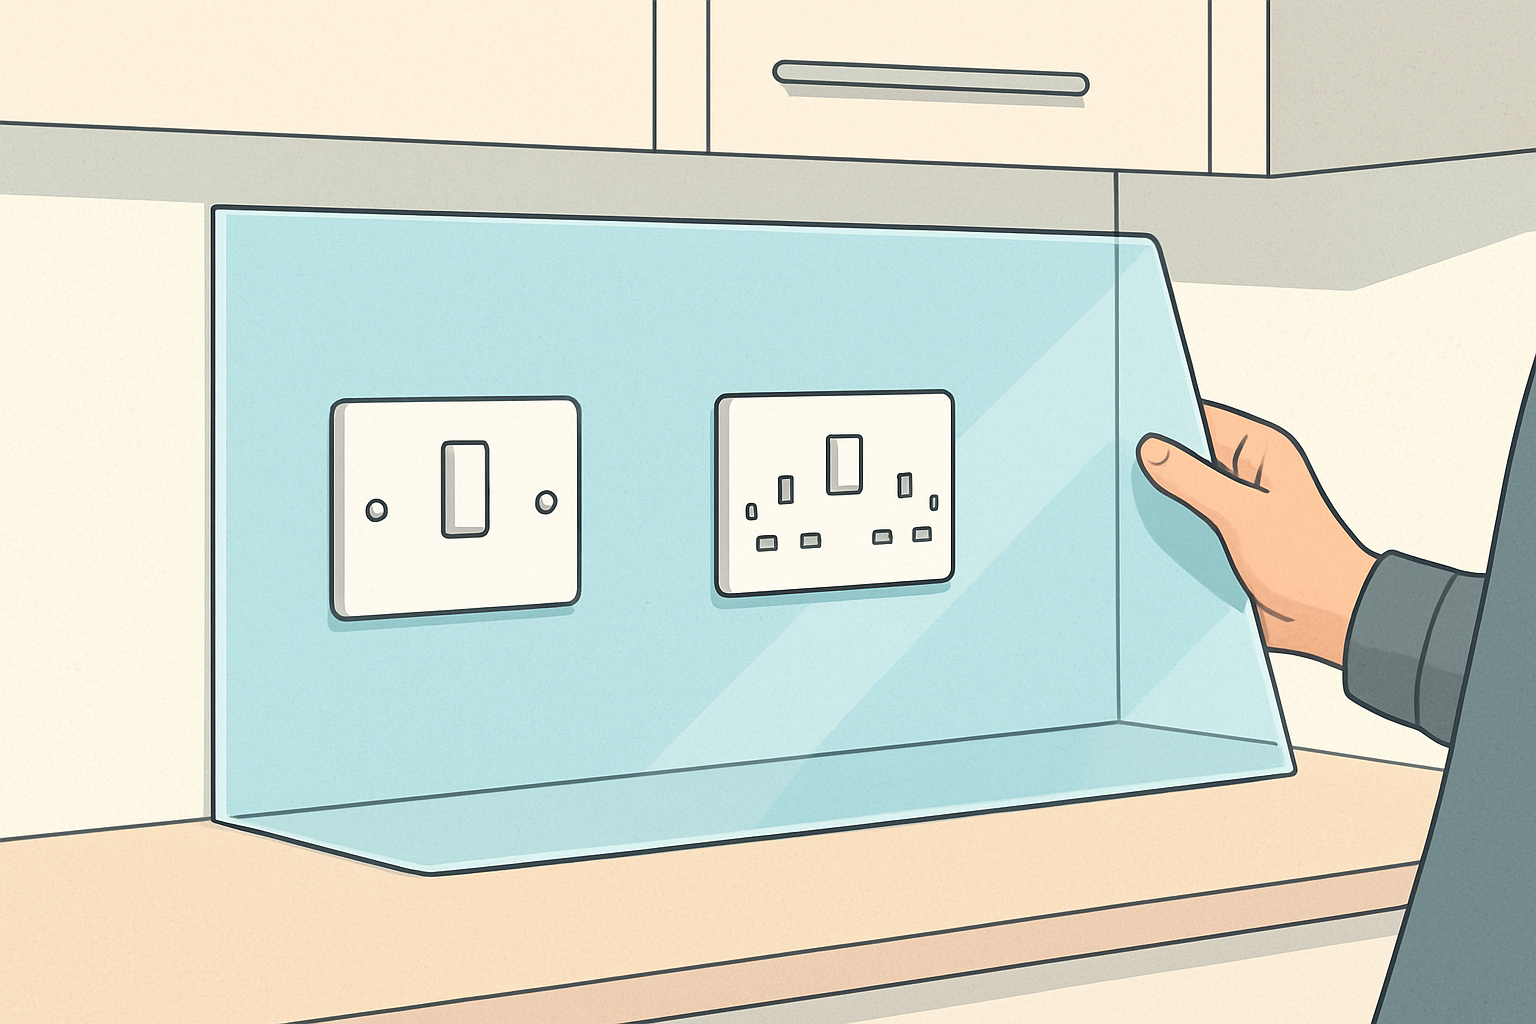
Glass splashbacks give kitchens and utility rooms that clean, finished look, but sockets can turn a simple decision into a design and installation question. The short answer is yes: we can fit glass splashbacks around sockets, switches and cooker controls. The key is how the glass is measured, cut and sealed so that the final result is safe, functional and easy to clean.
Where people get caught out is assuming the openings are “just holes” in the glass. In practice, sockets need correct clearances, precise alignment with the existing back box, and suitable fixing so the surrounding glass isn’t left under stress. Done well, the splashback looks seamless and wipes down without crumbs or grease collecting around the edges.
Why fitting around sockets matters more than it first appears
Splashbacks are installed in a high-splash, high-heat environment. Sockets sit right in the splash zone, so any mismatch between the glass and the wall outlet can create hygiene problems and long-term maintenance issues. Even a small gap can trap moisture and cooking residue, which may lead to staining or sealant breakdown over time.
There’s also a safety side. The electrical outlet must remain correctly accessible and properly finished with the right trims or faceplates. If the glass is installed without accounting for the socket depth, the faceplate may sit incorrectly, or you could end up with strain on the fittings when everything is tightened.
We recommend treating socket cut-outs as part of the design, not an afterthought. Our experience is that the best outcomes come from planning with the electrician and completing a proper template survey before any glass is produced.
How glass splashbacks are made for cut-outs around electrics
Glass splashbacks are typically manufactured from toughened safety glass (or laminated safety glass in certain scenarios). For openings, we use accurate templating so the cut-out sits exactly where the outlet and its back box need to meet. This is the difference between a splashback that “sort of fits” and one that looks built-in.
Once the location of each socket is confirmed, the glass is prepared with a clear opening and finished edges. Depending on the design, we may also incorporate a drilled fixing pattern around the perimeter (and sometimes around the cut-out area) to help the panel sit flat.
To get this right, we take into account:
- Socket centre lines and the spacing between multiple outlets
- How far the back box protrudes from the wall surface
- Switchgear depth and whether faceplates are standard or extended
- Whether there’s tiling, plaster repairs or wall unevenness behind the panel
- The splashback fixing method, including adhesive line placement
It’s also worth noting how different glass finishes behave. Back-painted glass and screen-printed graphics can be more forgiving visually if minor variations occur, but the physical cut-out still needs to align with the socket opening. If you’re comparing styles, it’s useful to understand how glass types perform in everyday environments; our team often discusses related options in articles like Glass splashbacks for kitchens.
What we look for when sockets are in the splash zone
Not every socket situation is identical, and a “one-size-fits-all” approach doesn’t work. We usually start by checking what’s already on the wall: new sockets or existing ones, whether the wall is flat, and whether any work has been done recently.
Common socket-related factors we assess include:
- Wall flatness: even a small bulge can make the glass sit unevenly near the cut-out
- Gaps around the back box: damaged plaster can cause the faceplate to sit proud
- Multiple sockets: the panel must remain stable across the full run
- Corners and returns: glass expands slightly under temperature, so the detailing needs to allow for movement
- Close neighbours: extractor switches, lighting controls, or plumbing that affects measurement
When we spot risk areas, we’ll advise on adjustments. For example, if an outlet is too recessed, the faceplate may not sit correctly once the splashback is installed. In some cases, we recommend aligning the electrics first so the final finish looks crisp and functions properly.
If your kitchen renovation includes other glass elements, it can also be helpful to understand how glass behaves in real installations, not just on flat walls. For commercial-style glazing performance thinking, our article on benefits of glass curtain walling offers a useful perspective on how glass systems are designed for real conditions.
Common mistakes people make (and how we prevent them)
We often see the same issues when customers try to plan around sockets without measuring properly. The biggest problem is assuming standard tolerances will cover everything. With glass, millimetres matter, especially around outlets where the trim and faceplate must line up cleanly.
Here are the most common mistakes, and the solutions we use:
- Cut-outs placed using room measurements instead of templating: we always map socket positions directly to the wall as it exists
- Ignoring socket depth: we confirm protrusion so the faceplate and cover sit correctly
- Over-tightening fixings near the cut-out: we use a fixing approach that avoids stressing the glass
- Relying on silicone alone for alignment: we use the correct adhesive and sealing plan so gaps don’t appear later
- Forgetting about wall finishing thickness: if plaster or tile work changes the surface, cut-outs must reflect that
Another frequent issue is choosing a design that requires a high level of precision but leaving it until late. If sockets aren’t finalised before templating, we may need to re-template, and that can delay the project. We always encourage customers to confirm electrics early, even if the rest of the kitchen is still being planned.
Practical ways to achieve a neat finish around sockets
A splashback can look either “integrated” or “added on”, and the socket area often decides which one it becomes. The difference usually comes from detailing: how the panel edges are finished, how adhesives are applied, and how the socket faceplates are mounted.
In a well-executed install, the opening in the glass sits behind the socket front plate so the outline is controlled. That keeps grease and condensation from creeping into the edges. If your splashback is back-painted or features a graphic, we also plan the alignment so the visual pattern doesn’t jump when sockets are introduced.
We commonly help customers plan socket detailing by clarifying:
- Whether the socket locations will remain exactly where they are now
- Whether any faceplates will change (for example, switching to a different style)
- Where the splashback run starts and ends, especially at corners
- Whether the splashback needs to work around a hob or cooker controls nearby
For those who are also upgrading entryways or shop fronts with glass, it’s useful to consider how different design constraints are handled in other glazing projects. For example, glass shop front costs can be influenced by fitting complexity and special requirements, which is a similar principle to splashbacks—complex cuts and precise fitting naturally affect effort and lead time.
Installation: what should happen near socket cut-outs
Installation should be predictable, but careful. We don’t treat socket openings as decorative trim; we treat them as part of the structural fit and the protective seal. That means checking alignment, ensuring the panel sits flat, and confirming that the electrics remain accessible.
Our typical approach includes preparing the wall surface so the glass can bond evenly. If the wall is dusty, uneven or recently plastered without curing, the adhesion can be compromised. We also make sure the panel placement keeps the cut-out aligned with the socket face.
Near sockets, we focus on three things:
- Maintaining correct clearance so faceplates do not bind or sit crooked
- Sealing and finishing so moisture and grease don’t enter the wall line
- Preventing stress points by avoiding unnecessary force on the glass during fitting
One practical tip we share with customers is to avoid trying to “help” the fit by trimming around the socket opening after delivery. Cutting toughened glass is not straightforward and can compromise safety. If anything doesn’t align, we’d rather re-template or adjust the electrics properly than risk the integrity of the panel.
Benefits of getting socket fitting right
When sockets are planned properly, the result is more than a good-looking kitchen. A correctly fitted glass splashback is easier to clean, more resistant to staining, and less likely to develop edge issues where condensation collects.
With socket cut-outs handled professionally, you also gain:
- A tidy finish that matches the rest of the splashback, not a patched area
- Better hygiene around outlets because gaps are controlled
- More reliable long-term performance because sealing isn’t fighting misalignment
- Improved usability because faceplates sit as intended and remain easy to remove
There’s also a practical design advantage. Once the sockets are accurately accommodated, we can confidently design longer continuous runs, rather than breaking panels to avoid electrics. That often improves the overall look of the kitchen, especially in open-plan spaces where the splashback is always in view.
Limitations and when extra planning is needed
Although we can fit glass splashbacks around sockets in most kitchens, limitations do exist. The main limitation is not the presence of sockets—it’s the condition of the wall and how final the electrical fittings are at the time of measurement.
Additional planning is usually needed when:
- Sockets have been moved recently and the wall around them isn’t finished yet
- The wall is uneven or has been repaired with varying plaster thickness
- There are multiple outlets close together that create narrow glass sections
- There’s a hob type with controls that sit unusually close to the backsplash line
- The socket faceplates are non-standard and need confirmed compatibility
Another consideration is lead time. If electrics are changing after templating, we may need a revised template for accurate cut-outs. To avoid delays, we suggest confirming socket positions and faceplate types before we measure.
If you’re comparing approaches, it can help to explore how different splashback styles influence design complexity. You can also browse our Splashbacks page for an overview of materials and typical setup considerations that feed into a smooth installation.
What readers should do next
If you’re planning a splashback and sockets are involved, the best next move is to treat templating as the start of the project, not the end. We recommend gathering basic details now—socket locations, faceplate style, and the final wall surface situation—so that templating captures the reality of the installation point.
To keep the process running smoothly, we suggest you prepare:
- Clear photos of each socket and the wall area where the splashback will sit
- Information about whether sockets will be moved or replaced
- Any planned changes to tiles, plaster finish, or kitchen layout
- Measurements of the run length and corner positions (even if we’ll template anyway)
Then speak with us about your preferred glass finish and how you want the socket area to look. We’ll align the cutting plan with the design, and we’ll flag any areas where slight adjustments to electrics or wall finishing would prevent future headaches.
What We Get Asked…
Can the socket itself be covered by a glass splashback?
We don’t cover the socket in a way that blocks access. Instead, the glass has a cut-out so the socket faceplate sits flush and remains usable.
Will a socket cut-out affect the strength of the glass?
Toughened safety glass can handle openings when produced correctly and installed without stress points. We ensure the cut-out and overall fixing strategy are designed together so the panel remains stable.
Do we need to remove the existing sockets first?
Often the socket can remain in place while we align the splashback, but any protrusion or incomplete finishing may need attention. If an electrician is due to adjust back boxes or faceplates, doing that before templating helps us get the cut-outs right.
What if the wall isn’t perfectly flat?
We can work with typical kitchen walls, but significant unevenness can cause gaps near the cut-out. That’s why we assess surface condition early and advise on any prep needed before installation.
Can we fit glass splashbacks around cooker switches as well?
Yes, provided the positioning is templated accurately and the glass openings are designed to suit the control faceplate. If there are multiple controls close to the backsplash line, early planning is especially important.
Our Final Thoughts
Glass splashbacks can be fitted around sockets, and the result can look seamless when the measurement and installation are done properly. The success of the project comes down to templating accuracy, socket depth and faceplate alignment, plus the correct sealing and fixing strategy around the cut-outs.
When we’re involved from the start, we help prevent the common mistakes that lead to gaps, staining and access issues. If your kitchen includes sockets within the splash zone, contact us to discuss templating and design options before anything is finalised—then you can enjoy a clean, professional finish that lasts.